simplenarrativesystem

Welcome to the documentation of Simple Narrative System plugin!

The simplest narrative system you can find for Unreal Engine 5.

You can find out this plugin on the FAB Marketplace at this page and you can find the source code at this page.

Here's an example project and for more support feel free to contact me :)

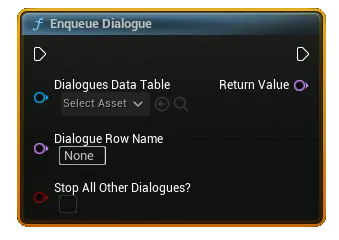
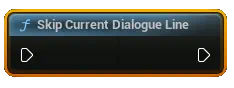
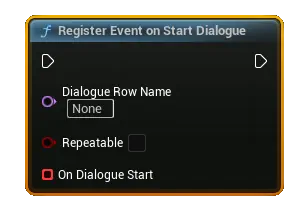
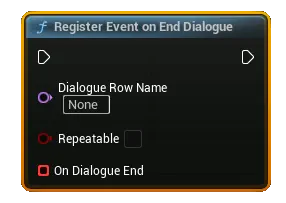
Read down below how to use properly this plugin.

Getting Started


After installing this plugin and open the project, you need to create two Data Tables. To create a Data Table just right click or presso on Add and select Miscellaneous and Data Table. (Image 1)
1
Then you need to select the Row Structure, one should use the row structure SNS_Speaker, and the other should use SNS_Dialogue. (Image 2)
2
Now you should have those two Data tables inside you Content Browser. (Image 3)
3

Speakers Data Table


SPEAKER DATA TABLE

Click on Add button to add a new speaker/row and rename it as desired.(Image 4)
I renamed it "MC" for "Main Character". (Image 5)
4
5
In the Row Editor menu (Image 6) you can change:
  • Speaker Displayed Name = the name that will be shown on the subtitles. (Image 7)
  • Speaker Color = the text color of the speaker's name on the subtitles. (Image 7)
6
7

Dialogues Data Table


DIALOGUE DATA TABLE
Click on Add button to add a new dialogue/row and rename it as you want. (Image 8)
I'm gonna rename it "FirstDialogue".
8
In the Row Editor menu (Image 9) you can change:
  • Audio Clip (optional) = It's the audio that will be played when the dialogue starts.
  • Speakers Data Table = It contains the speakers that will talk inside this dialogue. I've putted the previously created Data Table.
  • CanBeSkipped? = It's a boolean that if it's checked the player can skip this dialogue's lines by pressing a customizable key (Image 10).
  • Time Stamps = It's an array of dialogue lines (read below for more).
(It should look like Image 11)
9
10
11
Let's add the first Time Stamp by pressing the "+" button. (Image 12/13)
  • Speaker = Who will say this line.
  • Speaker Top Padding = An offset of the speaker's name text from the bottom on the UI useful if using various size of text. (Image 14)
  • Time Stamp = Time in seconds when this dialogue line ends.
  • Subtitle Text = The text that will be shown in the subtitles. In there you can use rich text tags for customize aspect of the text. Go in the Text Materials section to know how to make a custom one.
(It should look like Image 15)
12
13
14
15

How to use?

The main part of this Plugin is the Blueprint Funtion Library and in this secion we will look at each new node I've added.

EnqueueDialogue = If you want to play a dialogue when something appen just use this node. It will enqueue the selected audio and play it if there isn't any playing.
Just select the Dialogues Data Table and set the wanted dialogue inside Dialogue Row Name from the dropdown menu that will appear.
If you want to just play regardless if there is a dialogue playing check the StopAllDialogues? boolean.
SkipCurrentDialogueLine = Skips the current dialogue line NOT FULL DIALOGUE if the dialogue has checked the CanBeSkipped? boolean.
RegisterEventOnStartDialogue = Register a custom event to a dispatcher that will call this event when a dialogue start with the possibility to be repeatable with the check on "Repeatable". You must give this node a Row Name value which you can take from the EnqueueDialogue node or manually write it.
RegisterEventOnEndDialogue = Register a custom event to a dispatcher that will call this event when a dialogue ends with the possibility to be repeatable with the check on "Repeatable". You must give this node a Row Name value which you can take from the EnqueueDialogue node or manually write it.
RegisterEventOnAllDialogueEnd = Register a custom event to a dispatcher that will call this event when all dialogues end with the possibility to be repeatable with the check on "Repeatable".

EXAMPLE USING THOSE NODES:


How to save and load settings?

You need to get a reference of SNS_SettingsGameInstanceSS (SS = SubSystem, Image 16) since it brings to you access to these methods (Image 17):
16
17
GetSettings = Returns current widget's settings.
SaveSettings = Save settings on file by passing to this node a SNS_S_SettingsData struct.
Down below, I've put an example that you can find inside the Plugin folder at /SimpleNarrativeSystem/UserInterface/WBP_SNS_ChangeSettings. Those blueprint nodes, when UI button is checked, get current settings, modify the member Subtitles Enabled and then save settings.
DeleteSavedSettings = Delete all subtitle widget's saved settings. It can be setted to be executed only in Editor and executed by console using the command deletesns.
LoadSettings = Load settings from file and returns true if it succeds.
Down below, I've put an example that you can find inside the Plugin folder at /SimpleNarrativeSystem/UserInterface/WBP_SNS_Subtitles. Those blueprint nodes, when the UI Widget is loading, if you are in Editor, deletes current saved settings then loads the saved one.
If it succeed, get the loaded settings and apply them to the Widget. If it cannot load, save current Settings Data of the widget to file.

How to change widget appearance?

You will create you own widget blueprint that inherits from SNS_Widget (Image 18) or copy mine inside Plugins/SimpleNarrativeSystem/UserInterface/WBP_SNS_Subtitles and edit it. (Image 19)
18
19
From that widget, go inside Class Defaults (Image 20) you can modify Settings Data (Image 21):
  • Subtitles Enabled = If the widget should be shown.
  • Speaker Name Enabled = If the speaker name should be shown.
  • Subtitles Background Color = The color of the box behind the subtitles
  • Subtitles Text Color = The color of the text that will be shown in the subtitles.
  • Second Text Enabled = If the old line when ended should move up the current line.
  • Fade Out Enabled = If the lines when ended should fade out to transparent when ended.
You can also modify the Speaker Name Separator inside Default (Image 22):
  • Before Separator = The string that will appear before the Speaker Name.
    (Example with <: Image 23)
  • After Separator = The string that will appear after the Speaker Name.
    (Example with >: Image 23)
20
21
22
23

How does text materials works?

This plugin comes with some text animation effects like a wave effect and a rainbow text effect. I suggest reading this guide by Steve Streeting to know more how to make them.
You can find my examples inside project at Plugins/SimpleNarrativeSystem Contect/TextMaterials and there you will find Text Materials and Material Functions that you can explore to know how they work. When you've finished doing your custom material, go inside the RichTextBlockDecorator Data Table, add a new row and set the Font/Font Material inside Row Editor to the one you've created.

How it works behind the scenes? (C++)

If you open the plugin's source code you will find a lot of classes.

End

Thanks a lot for using this plugin! It means a lot to me